Canadian Visit, December 2005
Battle of Hong Kong Background
And
Battlefield Tour Points of Interest
By: Tony Banham
Table of Contents
Why Hong Kong? *The Battle of Hong Kong *
The Loss of the Mainland, 8-12 to 13-12 *
The Siege of the Island, 13-12 to 18-12 *
The Invasion of the Island, 18-12 *
The Forcing of Wong Nai Chung Gap, 19-12 *
Pushing the Line West, 19-12 to 25-12 *
Encircling Stanley, 19-12 to 26-12 *
Prisoners of War *
Today *
Points of Interest on the Itinerary *
Jardine’s Lookout *
The Anti-Aircraft Position *
Volunteer Pillboxes *
Sir Cecil’s Ride *
Lawson’s Bunker *
Repulse Bay Hotel *
Stanley *
Historians may never cease arguing over why Canadian forces were sent to reinforce Hong Kong. In retrospect, with perfect hindsight, it certainly seems a strange decision. It was one that Churchill himself initially opposed, and it now seems clear that however many men had been sent to defend Hong Kong, the Japanese would still have attacked with sufficient forces to take the Colony.
In the first half of 1941, Hong Kong’s garrison was commanded by General Grasset. It consisted of three infantry battalions, the 2nd Battalion the Royal Scots, the 5/7th Rajputs and the 2/14th Punjabis, plus one machine gun battalion, the 1st Battalion the Middlesex Regiment. These were supported by a large number of Royal Artillery Batteries, the Hong Kong Volunteer Defence Corps (HKVDC), and all the supporting units that an isolated garrison needed. Also, of course, the Royal Navy was there in some force. Altogether, the garrison consisted of some 10,000 men at this time.
In mid-July, Grasset was replaced by General Christopher Maltby. When Grasset left the Colony, he – himself a Canadian – suggested that the Colony be reinforced by two Canadian Battalions. Somehow he persuaded Churchill’s advisors to ask for these battalions, and he had also made his case to the Canadian Government. There are many theories as to how and why his representations were successful.
C Force finally arrived in Hong Kong just three weeks before the Japanese attacked. This brought the number of defenders to 12,000 (which, when police – who had been sworn in as militia – and front-line nurses are included, increased to a peak of around 14,000). This was, of course, too small a number to have a hope of stopping the Japanese. However, the war against Japan was primarily a war of attrition, and every soldier and piece of equipment lost by Japan in attacking Hong Kong was a step towards victory. It is often forgotten - as everyone knows it was the atomic bomb that ended the war - that without this attrition and the island-hopping war across the Pacific, the bomb could never have been carried to Japanese soil.
The eighteen days of fighting can neatly be summarised as six phases:
The Loss of the Mainland
The Siege of the Island
The Invasion of the Island
The Forcing of Wong Nai Chung Gap
Pushing the Line West
Encircling Stanley
In fact the last two phases were concurrent, but as the Stanley battle was the final engagement, it will be left to last.
The Loss of the Mainland, 8-12 to 13-12
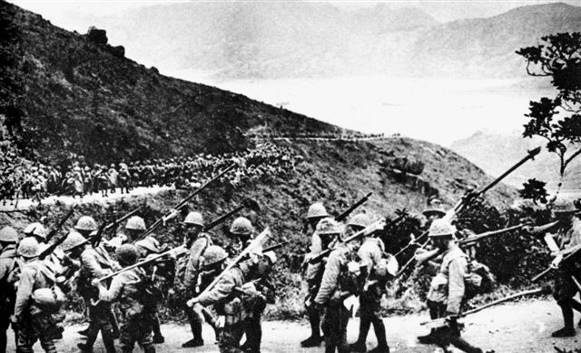
Beginning in the early hours of December 8th, the Japanese slowly but irresistibly moved south towards Kowloon. A small force of 2/14th Punjabis and Field Engineers, supported by infantry of the HKVDC, delayed their progress by sabotage until the Gin Drinker’s Line was reached.
Here, at the Shing Mun Redoubt, was the first – and telling – skirmish in which the 2nd Battalion the Royal Scots were pushed out of their position and fell back to Golden Hill. Golden Hill was very exposed, and in a far bigger battle the next day, it was given up. From then until the evacuation of the mainland there was only one other significant engagement, at the Ma Lau Tong line, as the Indian rearguard defended their retreat.
Canadian involvement in the Mainland fighting was minimal. Apart from a few Signalers, the only unit deployed was D Company Winnipeg Grenadiers, This Company was intended to plug a gap in the Gin Drinker’s Line, but by the time they had arrived in Kowloon, the decision to evacuate the mainland had already been taken.
The Siege of the Island, 13-12 to 18-12
With all defending forces now tied up on the Island, the Japanese started a concerted effort to bomb and shell all militarily significant areas. The Peak and the fixed defences (naval installations, gun batteries and pillboxes) were the major targets, though civilian areas in Central, Mid-levels, Causeway Bay, and Wan Chai were also hit with many casualties.
Of the Canadian forces, the Royal Rifles were the most exposed, and took some casualties. Wounded men were generally taken to the St Albert’s Convent Hospital.
During this time the defenders were organized into two Brigades. West Brigade, under Brigadier Lawson (the senior Canadian officer) consisted of the Punjabis, the Royal Scots, and the Winnipeg Grenadiers. East Brigade, under Brigadier Wallis, consisted of the Rajputs and the Royal Rifles. Both Brigades included elements from the Middlesex, the HKVDC, and supporting units.
The Invasion of the Island, 18-12
On the evening of December 18th, the invasion began. Japanese landings commenced between North Point and Shau Ki Wan, in conditions made all the more confusing for the defenders by poor weather and thick smoke from bombed industrial sites. The Rajputs, with elements of the Middlesex, HKVDC, Royal Artillery and Royal Rifles (in particular, C Company) becoming involved as the beachhead moved inland, put up the initial resistance. By midnight, almost the whole north-eastern corner of Hong Kong was in Japanese hands, with the line as far south as the northern most point of Jardine’s Lookout, and as far west as the North Point power station.
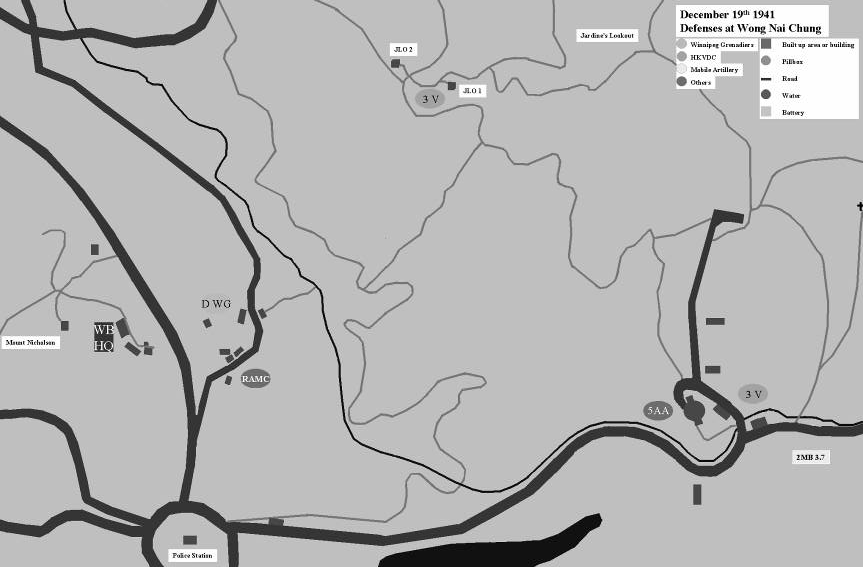
The Forcing of Wong Nai Chung Gap, 19-12
The Japanese strategy was simple: take Wong Nai Chung Gap and continue south along Repulse Bay Road to split the island in two. This necessitated keeping East Brigade busy so they could not organise any useful counter-attack, while other Japanese forces concentrated on knocking out defences on Jardine’s Lookout and Mount Nicholson (overlooking the Gap from the east and west respectively), and in the bottom of the Gap itself. Once this was done, and the strategically important Police Station at the south of the Gap was captured, the fighting moved south along Repulse Bay Road. In 1941 it was relatively sparsely populated, thus the skirmishes on this and later days were generally named after the isolated houses at or around which they occurred; from north to south: Postbridge, Altamira & The Ridge, Twin Brooks, Overbays, Repulse Bay Hotel, Eucliffe.
 This was by far the hardest day’s fighting, with the
defenders losing in twenty-four hours approximately one third of their
total fatalities. Losses to the attackers were probably in a similar
ratio.
This was by far the hardest day’s fighting, with the
defenders losing in twenty-four hours approximately one third of their
total fatalities. Losses to the attackers were probably in a similar
ratio.
By midnight, although there were still pockets of resistance, the Gap and the majority of the road were in all practical terms in Japanese hands.
How far south Japanese forward patrols advanced along the road that day is uncertain, but there is a distinct possibility that a few small groups or individuals reached the south coast itself.
Pushing the Line West, 19-12 to 25-12
As early as the night of the 18th, the defenders had the genesis of a line running south from the Power Station through the developed north coast to the hills, preventing the Japanese from advancing to Central. Over the next few days, this ‘northern sector’ was pushed steadily west with the northern-most anchor moving from Caroline Hill quickly back to Leighton Hill (which was defended energetically by the Middlesex) and finally Morrison Hill and Mount Parrish, while street fighting was rife in Wan Chai. The southern anchor moved from Wong Nai Chung Gap to Mount Nicholson, then Mount Cameron, and finally Wan Chai Gap and a little west.
Further south was the ‘central sector’. Here Mount Nicholson was taken with ease, but Mount Cameron was a hard struggle, with Wan Chai Gap being held almost to the end. Finally, the ‘southern sector’ which fell back in stages from Shouson Hill, to Brick Hill, to the stoutly-defended Bennet’s Hill.
It was this relentless western progress that prompted the surrender on the 25th, by which time it was felt that Wan Chai could not be held any longer. Central was already within the range of small arms fire from the central sector.
Encircling Stanley, 19-12 to 26-12
When East Brigade HQ at Tai Tam withdrew towards Stanley on the 19th, fighting on two fronts became impossible to avoid. Delaying actions at Red Hill and Bridge Hill could not prevent the Japanese advance from the northeast, and the Repulse Bay Hotel area could not be held against their advance from the northwest. The circle tightened around Stanley Mound and Stone Hill, where Canadians and Volunteers fought it out with the invaders in particularly tough country, and finally squeezed them into the Stanley peninsular itself. By the time of the official surrender on Christmas Day, the first two of three defensive lines had fallen. However, the defence of the final line was maintained until the early hours of December 26th, when written orders to surrender were finally delivered to Brigadier Wallis.
Most people imagine that, at surrender, the garrison was taken prisoner en masse. In fact, prisoners were taken from the very start of the fighting, with Graham Heywood of the HKVDC almost certainly being first (he was checking rain gauges on the border when the Japanese crossed). At the fall of the Shing Mun Redoubt, he was followed by a number of Royal Scots – primarily from 8 Platoon, A Company – and others.
Few, if any, further men of the garrison were captured on the mainland. One Winnipeg Grenadier, John Grey, disappeared, but there is circumstantial evidence that he was set upon by looters.
These early prisoners were taken to Fan Ling, and did not rejoin their comrades until mid January.
The next batch to be captured were rounded up during and after the fighting in Wong Nai Chung Gap on December 19th. These included many Winnipeg Grenadiers. On the 20th, they were marched to North Point refugee camp, which then started its short career as a POW camp. Men were captured in skirmishes between then and the surrender, and in the main seem to have been taken to North Point. There are rumours of some being sent to Shamshuipo at this time, but the West Brigade POWs sent there after the surrender claim that it was empty when they arrived.
The first capture of non-Chinese civilians on the Island was at the Repulse Bay Hotel. These were marched through Wong Nai Chung Gap to a paint factory in North Point.
Soon after the surrender, some 2,000 men of East Brigade, captured at Stanley, joined their comrades at North Point. At the end of December, the men of West Brigade were ferried to Shamshuipo, which was to be the main Hong Kong camp during the war.
In January, the camps were rationalised. North Point became the Canadian and Royal Navy Camp, Shamshuipo became the British Army and HKVDC camp, Ma Tau Chong was opened as the British Indian Army Camp, and ‘enemy’ civilians were sent to Stanley Internment Camp . Other civilian internment camps were opened at Rosary Hill and Ma Tau-wai.
In April 1942, the Argyle Street Camp was opened for officers, who were accompanied by 100 Other Ranks who primarily acted as cooks and batmen.
This was the situation until early September 1942, when the first transportation of POWs to Japan took place. In late September, the Lisbon Maru sailed. Between them, these ships had removed nearly 2,500 men – primarily from Shamshuipo. This opened enough space for the remaining Canadian POWs in North Point to be moved there; North Point was then closed. In 1944, Argyle Street was closed too, with the remaining officers moving to Shamshuipo (which was then split into camps ‘N’ and ‘S’). The situation in Hong Kong then remained unchanged – apart from the continual shipment of men to Japan – until the end of the war.
For Canadian forces, the first transportation to Japan was the ship that left after the Lisbon Maru. The Tatu Maru (or Tatsuta Maru) left on 19 Jan 1943 to Kawasaki 3D, Omine, and eventually other camps. Next, the Manryu Maru departed Hong Kong on 15 Aug 1943 for Oeyama and the infamous Niigata camp. The Toyama Maru left on 15 Dec 1943 for Narumi and Toyama, and finally the Naura Maru departed on 29 April 1944 for Sendai. All these men stayed in Japanese camps until liberation.
Post-war, two war cemeteries were established. The Commonwealth War Graves Commission conducted a two-year project to try and find and identify the bodies of those lost in the fighting. Most bodies were eventually recovered, but many remain unidentified.
Sai Wan Cemetery, the bigger of the two, contains the majority of the Canadian interments. These are grouped around the Cross of Remembrance at the bottom of the slope. The cemetery also contains the remains of servicemen from many other units that fought in Hong Kong – whether they died during the fighting or as POWs – and a large number of men from Singapore and elsewhere who died as POWs in Taiwan and were later reinterred in Hong Kong.
Stanley Cemetery, which was originally an old garrison cemetery, was re-opened during the war for the burial of civilians who died in the camp there. Post-war it was extended and was used as the primary burial ground for the HKVDC and BAAG (British Army Aid Group) members. Only twenty Canadians are known to be buried there, but it seems likely that many of those graves marked as ‘Known Unto God’ also contain Canadian remains.
In remoter areas of Hong Kong – especially in terrain unsuitable for urban development – many pillboxes, brigade shelters, gun sites and other parts of the fixed defences survive. The biggest single complex that remains, the Shing Mun Redoubt just south of Jubilee Reservoir in fact saw little fighting. Historically more important are the shelters and pillboxes in the centre of Hong Kong Island (from Tai Tam, through Jardine’s Lookout, to Wanchai Gap in the north and Bennet’s Hill in the south) as these saw plenty of action.
Surprisingly, evidence of the wartime bombing and shelling can still be seen at several sites in the urban areas.
While Hong Kong has always been progressive in its attitudes, recent years have seen a resurgence of interest in its history, including the Colonial period, World War Two, and the Canadian involvement.
Points of Interest on the Itinerary
When it was realized that the Japanese were attacking from the Shau Ki Wan area towards Jardine’s Lookout, it was decided to reinforce the latter with elements of the Winnipeg Grenadiers.
There is a certain amount of uncertainty over the exact spot where Osborn sacrificed his life. The original VC citation claimed it was on Mount Butler, but there is no evidence that the Winnipeg Grenadiers got any closer to Mount Butler than the col between it and Jardine’s Lookout to the south west. Eye-witness reports best fit the model that the spot was somewhere south of the peak of Jardine’s Lookout. The spot pointed out by a survivor of the incident, however, is even further south. Today this is marked by a small cairn, but it is not signposted as the ground is treacherous. The plaque itself is about fifty yards due west of that spot, on the main path to the peak of the hill.
Osborn’s men report that he was respected, rather than liked. An old soldier, he had been born in the county of Norfolk in the UK, and fought with the Royal Naval Division in the Great War. Post-war, he moved to Canada.
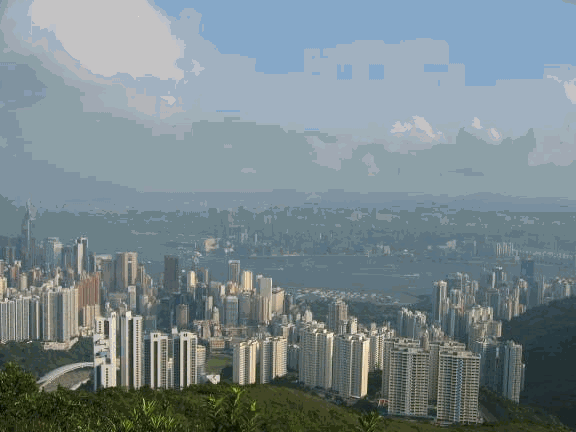
View from the top of Jardine’s Lookout
On Dec 19th 1941 the Wong Nai Chung AA position housed two mobile 3.7 inch guns. Closely comparable to the famous German 88, these were modern weapons manned by the 7th Heavy Anti Aircraft Regiment. The position came under attack from the west early that morning, and reinforcements were called for. The Hong Kong and Singapore Royal Artillery sent men from further east, but the attack was too strong. Before long, 19 Royal Artillery men – and a large number of HKSRA gunners who had come to their aid – lay dead.
For both historical and practical reasons, this position has been chosen as the start of the new Wong Nai Chung Gap Trail which covers the area fought over so heavily by the HKVDC, Winnipeg Grenadiers, Royal Artillery, Royal Engineers, Royal Scots, Middlesex, Punjabis, and many other units.
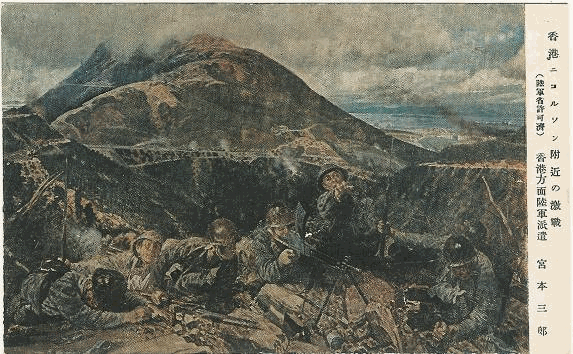
Painting of the attack on the AA position, by Japanese war artist Hoshum Yamaguchi
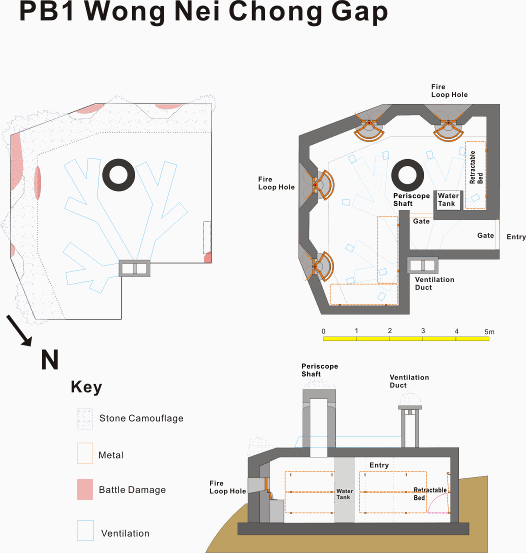
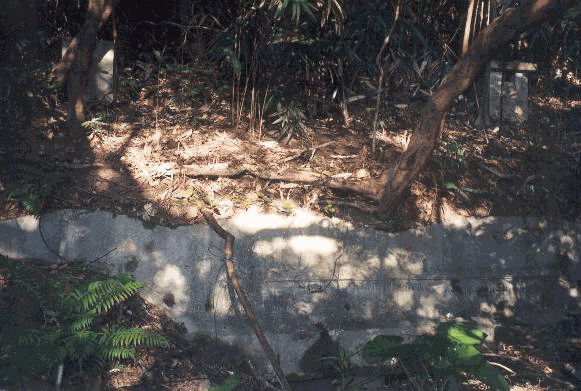
These two pillboxes, known as JLO1 and JLO2, were manned by 3 Coy (Eurasian) of the HKVDC. The two positions gave each other effective covering fire, but the Japanese – approaching from the north – soon found a weak point in the wire defences. They cut the wire above a catchwater that passed between the two pillboxes, and sent men with light machine guns into it. The defenders realized what was happening, and also put men into the concrete ditch. After a number of skirmishes, the Japanese reached the upper pillbox and an HKVDC private led an attack to clear them. He was killed. Luckily a Winnipeg Grenadier Corporal (Rix) followed and successfully dealt with the invaders. However, by evening most men were dead or wounded, and the few who were able were ordered to escape. Most of the defenders were captured where they lay.
Pillbox JLO 1 by Tan Yuk-kor
This horse riding trail happened to lead from behind the Japanese landing grounds to the centre of the island, and was therefore naturally their chosen approach route. Initially it was defended by elements of 3 Coy (Eurasian) HKVDC, but as the Japanese pushed further south along it they also came under heavy fire from Winnipeg Grenadier positions at the bottom of Wong Nai Chong Gap, and from Royal Scots positions on the east-facing slopes of Mount Nicholson.
Although this path was paved some six years ago, broken bullets from the defenders, and rifle cartridges from the attackers, can still sometimes be found at its edges.
The Japanese also attacked southwards over the top of Jardine’s Lookout (from Mount Butler), and along the stream at the bottom of Wong Nai Chung Gap. It was the attack over the top that led to many of the casualties amongst the Winnipeg Grenadiers on December 19th 1941 – and the loss of Sergeant Major Osborn VC.
Japanese infantry advancing along Sir Cecil’s Ride, courtesy Mainichi Shimbun
For many years almost invisible and sunk deep into the soil, the bunker complex has recently been exposed and restored. Here was West Brigade’s HQ. Lawson himself felt that the position was too exposed, and planned to move to Black’s Link on December 19th. However, by 07.00 on the morning of that day they were already under attack. Lawson called for help, and elements of the Royal Scots and the Punjabis did their best to reach him. Japanese ambushes prevented them from advancing, though a few individuals did get through. By 10.00 the position was under heavy machine gun fire, and it was decided to break out rather than surrender. Lawson, and most of the others in this position, were shot dead as they attempted to escape.
The defenders never really recovered from the loss of West Brigade’s Headquarters, although the nearby HQ of D Coy Winnipeg Grenadiers held out until every single man was either dead or wounded.
Lawson himself was originally buried by the Japanese on this site – having bled to death from machine gun bullet wounds in his thigh – but was later re-interred at Sai Wan.
Lawson’s Bunker, as it was for many years
The old Repulse Bay Hotel, a pre-war haunt of Hemingway and many other famous names, held a strategically important position near the end of the Repulse Bay Road which bisected the island. By December 19th, over 200 guests were present. Many were wealthy businessmen and celebrities who happened to be caught in Hong Kong when war started, and others were rich Hong Kong citizens who were fleeing the bombing and shelling of the city below. When the Japanese moved south along Wong Nai Chung Gap, the hotel became the westernmost position held by east brigade on the south coast.
Initially the military force there numbered less than fifty, but it was soon reinforced by the Royal Rifles. As the Japanese cordon around the hotel tightened – fighting even occurring within the hotel itself - it was decided that the soldiers would escape towards Stanley, and the civilians would peacefully surrender the Hotel to the invaders.
The hotel was demolished in 1982. Though the building opposite (at the bottom of the photo) is the original hotel garage, what passes for the hotel main building today was in fact reconstructed in the late 1980s.
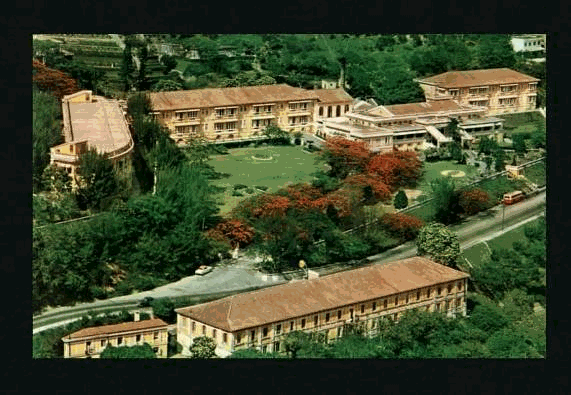
The Repulse Bay Hotel, taken around 1960 but showing the site unchanged since 1941.
Brigadier Wallis realized very early on the 19th that the Japanese were seeking to split West Brigade from East Brigade. He therefore ordered that East Brigade abandon its positions on the eastern side of the island, and regroup in the hills just north of Stanley. There they could be in easy contact with their comrades in West Brigade.
However, Wallis did not know that his counterpart, Lawson, had been killed early that morning, and that the Japanese had already effectively cut the island in two.
Initially, East Brigade’s infantry elements, the Royal Rifles and1 and 2 Companies of the HKVDC, tried to break through to West Brigade near the Repulse Bay Hotel on the 20th. When that failed, they planned to attack the Japanese from the right flank (through what is now Tai Tam County Park), on the 21st, at Wong Nai Chung Gap. When this attack in turn ground to a halt in the Red Hill area, they instead attacked north from the Repulse Bay Hotel and reached as far as the Ridge that same evening.
By the 22nd, however, they were hemmed in. That day and the next saw the hilltops immediately north of Stanley change hands more than once. On the 24th, the defenders pulled back into Stanley peninsula itself. When – that night – the Japanese attacked, the street fighting resembles that in Wan Chai. However, the sheer density of automatic weapons available to both attackers and defenders made this arguably the first ‘modern’ battle. The Japanese pushed past the guns of 965 Defence Battery, then through Middlesex and advanced HKVDC positions, and finally through to the line held by 2nd Battery, HKVDC. Within yards of this line, St Stephen’s School had been turned into an emergency hospital. The Japanese cleared the building, killing men too injured to move, and later raping and murdering several nurses. A number of other men were also murdered at this time.
On Christmas afternoon at about 1pm, in the last infantry attack of the battle, D Company of the Royal Rifles was ordered to attack and retake the ridge north of Stanley cemetery.
In broad daylight, with neither artillery nor machine gun support, D Company charged uphill through the cemetery towards the heavily entrenched Japanese occupiers. With fixed bayonets and firing as they ran, the riflemen broke through the initial line of defence and penetrated the Bungalows at the top of the ridge. In this vicious, often hand-to-hand, struggle there were many casualties on both sides.
Witnesses of the attack remember the reckless courage of the Canadians, and the price paid. The battle was short, but it cost D Company over 100 casualties, with some 28 men being killed.
In the early hours of December 26th, orders to cease fire finally reached Stanley. The fighting was over; the battle to survive the prisoners of war years was about to begin.